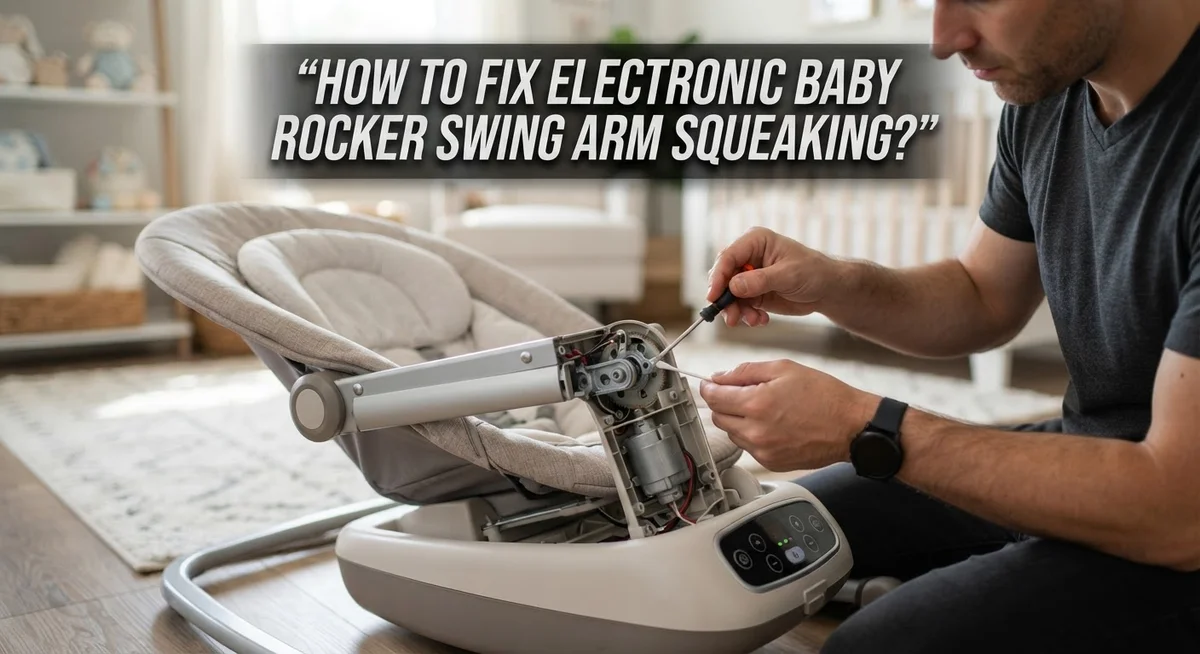
How to Fix Electronic Baby Rocker Swing Arm Squeaking?
That annoying squeak from your baby’s electronic rocker swing can turn nap time into a stressful guessing game. You rock, it squeaks. You swing, it squeaks again. It feels like the noise gets louder right when your baby finally starts to doze off.
The good news? This is a very common problem. Most swing arm squeaks happen at the joints or swivel points where metal or plastic parts rub together during motion.
You don’t need to replace the whole swing. In many cases, a simple fix can restore quiet operation in minutes.
In a Nutshell
- Find the source first. The squeak almost always comes from the swing arm’s joint or swivel point. Locate it before you grab any lubricant.
- Use the right lubricant. White lithium grease works best for long lasting results. Graphite dry lube is a great backup option too.
- Skip regular oil. Standard oil based lubricants leave a messy residue. They can also attract more dust over time.
- Check your power source. Running the swing on plug in power often reduces squeaking. Battery operation tends to make the noise more noticeable.
- Apply lube directly. Put your chosen lubricant right on the joint or swivel. This targets the exact spot causing trouble.
- Try masking the sound. White noise or soft music can help offset the squeak. This won’t fix it, but it can ease the stress while you work on a solution.
Why Baby Swing Arms Squeak: Common Causes
Your baby’s electronic rocker swing squeaks because the moving parts rub together without enough lubrication. The swing arm contains joints and swivel points that move back and forth during operation. Over time, these connection points dry out and lose their protective coating.
Friction between metal or plastic parts creates that annoying high pitched sound. The more the swing operates, the faster the lubricant wears away. Battery powered swings tend to squeak more than plug in models because the power delivery differs slightly between the two options.
Dust and debris also collect in the joint areas. These tiny particles act like sandpaper on the moving surfaces. When the arm swings, the debris creates additional friction and noise.
The type of lubricant matters significantly. Many parents use standard household oils thinking they will solve the problem. These products leave sticky residue that attracts more dust and actually makes squeaking worse over time. The residue can also drip onto fabric parts of the swing.
Temperature changes affect the materials in your swing too. When plastic and metal expand or contract, they shift slightly. This shifting opens small gaps where squeaking starts.
Manufacturing tolerances play a role as well. Some swings have tighter joints than others right from the factory. Looser joints squeak sooner because they allow more movement between parts.
The good news is that squeaking rarely means something is broken. Your swing’s mechanical system still works perfectly. The sound is simply a sign that the moving parts need attention. Identifying the exact cause helps you apply the right fix quickly and effectively.
Tools and Lubricants You’ll Need Before Starting
Before you start fixing that squeak, gather a few basic items. You won’t need much, and most people have some of these supplies at home already.
Lubricants are your main tool here. White lithium grease is the top choice because it lasts longer and doesn’t leave messy residue on the swing. Graphite dry lubricant works well too if you prefer a cleaner application. Teflon based lubricants are another solid option for swivel joints. Avoid regular household oils or WD40 style products, as these attract dust and create sticky buildup over time.
You’ll also want a small applicator brush or cotton swab. This helps you apply lubricant directly to the squeaking joint without getting grease everywhere. A toothbrush works in a pinch for this purpose.
Grab some clean cloth or paper towels to wipe away excess lubricant. You may find dust or debris packed into the joint area, so having cleaning supplies ready saves time.
A small flashlight or headlamp is genuinely helpful. The swing arm joints are often in tight spots that are hard to see. Good lighting lets you spot exactly where the squeak originates.
Finally, consider having your power source options ready. If your swing uses batteries, have a plug in adapter available. Switching between power sources can help you test whether the noise changes, which gives you useful information about what’s causing the squeak.
That’s really all you need. Keep everything within arm’s reach before you start working. This setup takes just a few minutes to prepare and makes the actual fix much smoother.
Step-by-Step: Locating the Squeaking Joint or Swivel
Finding the exact location of the squeak is your first real step. Start by turning on the swing and listening carefully to where the noise comes from. The sound almost always originates from the swing arm’s joints or swivel points where the arm connects to the main frame.
Move your ear around the swing slowly while it operates. Pay attention to the areas where metal or plastic parts meet. The squeaking typically happens at connection points rather than along smooth surfaces. You may notice the noise gets louder at certain angles or positions during the swing’s motion.
Use your small flashlight to inspect these joint areas closely. Look for visible signs of wear, dust buildup, or debris around the connection points. Dust particles often accumulate in these spaces and contribute to friction sounds. Gently press on different parts of the swing arm while it’s running. This can help you narrow down the exact location.
Pay special attention to where the arm pivots side to side. Check the points where the arm connects to the motor housing too. Sometimes multiple joints squeak, so listen for different pitch levels in the noise.
Once you’ve identified the main squeaking point, mark it mentally or use a small piece of tape as a reference. This saves time when you apply lubricant later. If you notice squeaking at several locations, that’s normal and you’ll treat each spot the same way.
Take your time with this step. Accurately locating the problem joint means your lubricant application will be much more effective. You won’t waste product or effort treating the wrong areas.
Step-by-Step: Applying Lubricant to Fix the Squeak
Now that you’ve found the squeaking joint, it’s time to apply your chosen lubricant. This step is straightforward but requires care to avoid over-application.
Start by preparing your work area. Make sure the swing is unplugged and completely still. This prevents accidental movement and keeps you safe while working. Give yourself good lighting so you can see the joint clearly.
Take your applicator brush or cotton swab and dip it lightly into your lubricant. You need only a small amount. Too much lubricant attracts dust and can drip onto fabric surfaces where you don’t want it.
Apply the lubricant directly to the squeaking joint. Place it right where the arm pivots or swivels. Work it gently into the joint by moving the arm slowly by hand a few times. This helps distribute the lubricant evenly throughout the connection point.
Wipe away any excess with a clean cloth or paper towel. This step matters because leftover lubricant can get messy and create sticky spots.
Let the lubricant sit for about 10 to 15 minutes before plugging the swing back in. This gives it time to penetrate the joint properly.
Test your work carefully. Plug in the swing and let it run for a minute or two while you listen closely. The squeak should be noticeably quieter or gone completely. If you still hear noise, wait a bit longer and test again.
Sometimes the lubricant needs a few minutes of operation to fully settle into place. Most squeaks disappear after this initial application. If the sound returns after several weeks, simply repeat the process.
Battery vs. Plug-In Power: Does It Affect Squeaking?
Power source choice genuinely affects squeaking levels in electronic baby rockers. Plug-in models tend to squeak less than battery-powered versions because they deliver consistent, steady power without voltage fluctuations.
Battery-powered swings experience voltage drops as batteries age. This inconsistent power delivery causes the motor to work harder, which increases friction at the swing arm joints. The result is more pronounced squeaking during operation. Plug-in models maintain stable voltage throughout use, so the motor runs smoothly without extra strain on moving parts.
Here’s the practical takeaway: if your battery-powered swing squeaks, switching to plug-in power can reduce the noise. This won’t eliminate squeaking completely, but it provides meaningful relief. The reduction happens because the motor doesn’t struggle as much against worn or dry joints.
Battery condition matters significantly too. Old or weak batteries force your motor to compensate by working overtime. Fresh batteries improve performance and reduce squeaking temporarily, though lubrication remains your best long-term solution.
Some parents use plug-in power during peak squeaking times and switch to batteries for portability. This hybrid approach works well if your swing sits in one main location.
Keep in mind that power source alone won’t fix squeaking joints. You’ll still need to apply lubricant directly to the squeaking pivot points for lasting results. Think of switching power sources as a helpful supporting step, not a complete fix.
If you primarily use batteries, consider investing in a plug-in adapter if available for your model. This single change often provides noticeable improvement. Combined with proper lubrication, you’ll get the quietest operation possible from your swing.
Mistakes That Make Squeaking Worse
Many people accidentally make squeaking worse by choosing the wrong lubricant. The biggest mistake is using standard household oils or general purpose lubricants. These products leave sticky residue that attracts dust and dirt over time. The residue actually builds up around the joint, making the squeak return faster than before.
Oil-based lubricants also break down quickly on moving parts. They evaporate or get pushed out of the joint during operation. This means you’ll need to reapply them constantly, which wastes your time and money.
Another common error is applying too much lubricant at once. Excess product drips onto other parts of the swing and creates a mess. It can also damage fabric or electronic components if it spreads to the wrong areas. Less is truly more in this situation.
Some parents ignore the power source variable entirely. They keep using batteries even when squeaking gets worse. Battery-powered operation actually intensifies the problem because weak batteries force the motor to work harder. This extra strain increases friction at the joints, which amplifies noise.
Don’t skip the waiting period after application. Rushing to test the swing immediately prevents the lubricant from settling properly into the joint. You’ll think your fix didn’t work when it simply wasn’t given enough time to penetrate.
Finally, avoid reapplying lubricant every single day. This creates buildup that defeats the purpose. Apply once, wait the recommended time, test thoroughly, and only reapply if squeaking returns after several days of use. Patience and the right product choice prevent most squeaking problems from getting worse.
Troubleshooting: What to Do If the Squeak Persists
If squeaking continues after your first lubrication attempt, don’t worry. This happens more often than you’d think. The issue might stem from multiple squeaking points on the swing arm, not just one.
Start by listening carefully to your swing again. Move your ear around different joints and pivot points. You may discover that the main squeak comes from a secondary location you missed initially. Apply lubricant to this new spot using the same method as before.
Sometimes squeaking persists because the lubricant you chose wasn’t ideal for your specific swing model. If you used a standard oil-based product, try switching to white lithium grease or graphite dry lubricant instead. These options work better on swivel joints and last significantly longer without leaving sticky residue.
Another reason squeaking continues is inadequate waiting time. The lubricant needs proper time to settle into the joint. Wait a full 15 to 20 minutes before testing again. Rushing this step prevents the product from reaching deep into the squeaking area.
Check your power source too. If you’re using batteries, try switching to plug-in power temporarily. This reduces motor strain and can minimize squeaking noticeably. Weak batteries force your motor to work harder, which amplifies noise at the joints.
If squeaking still persists after trying these steps, the joint itself might have internal wear or damage. In this case, the swing arm may need professional repair or replacement. Contact the manufacturer’s support team with details about your troubleshooting attempts. They can assess whether your swing needs service or if a replacement part is necessary for your specific model.
Maintenance Tips to Prevent Future Squeaking
Regular maintenance keeps your baby rocker swing quiet and working smoothly. The best prevention starts with understanding what causes squeaking in the first place.
Clean the swing arm joints regularly. Dust and debris accumulate around pivot points and swivel areas. Use a soft, dry cloth to wipe these spots weekly. This simple step removes particles that contribute to friction and noise.
Check your swing’s power source consistently. If you use batteries, replace them every few months even if they still work. Weak batteries force the motor to strain, which increases squeaking over time. Switching to plug-in power whenever possible reduces stress on the mechanical parts and keeps everything running quieter.
Apply preventive lubrication every three to four months. You don’t need to wait for squeaking to start. Use white lithium grease or graphite dry lubricant on all swing arm joints and swivels. Apply a small amount directly to the squeaking joint, then let the swing run for one to two minutes. This distributes the lubricant evenly throughout the moving parts.
Avoid common maintenance mistakes. Don’t use standard oil based products, as they leave sticky residue that attracts dust. Never apply excessive lubricant at once. A little goes a long way on these delicate mechanisms.
Store your swing in a dry location when not in use. Moisture promotes rust and corrosion on metal joints. Keep the swing away from extreme temperatures, which can affect how lubricants perform.
Finally, inspect the swing arm visually each month. Look for visible wear, cracks, or loose connections. Catching problems early prevents squeaking from developing into larger mechanical issues that require professional repair or replacement.
Final Thoughts
Fixing a squeaky baby rocker swing arm is a simple job. Most squeaks happen at the joints and swivels where parts rub together. With the right approach, you can solve this problem in minutes.
White lithium grease works best for most swing models. It lasts longer and does not leave a sticky mess behind. Graphite dry lube is a good backup choice if grease is not available.
Remember that your swing’s power source plays a small role too. Plugging in your swing instead of using batteries can reduce squeaking slightly. This is not a complete fix, but it helps.
Patience matters more than people think. Give the lubricant time to work into the joint before testing your swing again. Rushing this step often leads to disappointing results.
If squeaking still bothers you during those first few days, try playing soft music or white noise. This simple trick masks the sound while your baby sleeps or plays. It buys you time without stressing about the noise.
Every swing model is a little different. What works for one parent’s swing might need slight adjustments for yours. Stay curious and test different approaches if the first attempt doesn’t fully solve things.
The good news is that squeaking is almost always fixable. You rarely need professional repair or a replacement part. A few household tools and the right lubricant can restore quiet operation quickly.
Taking care of this small issue makes a big difference. Your baby sleeps better without sudden noise interruptions. You also gain peace of mind knowing your swing works smoothly.
With proper lubrication and a little patience, your electronic baby rocker swing will run quietly again. That silence means more restful moments for both you and your little one.
Frequently Asked Questions
Why does my baby rocker swing squeak when it operates?
Squeaking happens at the swing arm joints and swivel points. These areas move back and forth constantly during operation. Over time, friction builds up at these connection points. Metal rubbing against metal creates that annoying sound. Battery powered models tend to squeak more than plug in versions because of power delivery differences.
Which lubricant should I use to stop the squeaking?
White lithium grease works best for most swing models. It lasts longer and doesn’t leave oily residue behind. Graphite dry lube is another solid choice. It won’t act as a solvent or attract dust. Teflon based lubricants also work well on swivel joints. Avoid standard oil based products because they get sticky and collect debris.
Does switching from batteries to a plug in power source help?
Yes, but only marginally. Plug in power does reduce squeaking compared to battery operation. This happens because electrical current flows more consistently. However, switching power sources alone won’t eliminate the noise completely. You still need proper lubrication at the joints. Think of it as a helpful bonus, not a complete fix.
Can I mask the squeaking sound instead of fixing it?
Absolutely. White noise or soft music can offset the squeaking perception. Your brain focuses on the louder, more pleasant sounds instead. This works as a temporary solution while you gather supplies for lubrication. Many parents use this approach during the first few days after noticing the squeak.
How often should I lubricate the swing arm joints?
Apply preventive lubrication every three to four months. Regular maintenance keeps your swing quiet and functioning smoothly. Clean around the joints first to remove dust and debris. This helps the lubricant work more effectively once applied.

Hi, I’m Sonny Dawson, the creator and voice behind ConvertResizeGen. 👋 I’m a passionate tech enthusiast who loves exploring the latest gadgets, devices, and electronics that shape the way we live and work. Through my website, I share honest, hands-on reviews of trending Amazon products to help you make smarter buying decisions.